
vBCms Comments
Welcome To Hunting Country
General Hunting Forums
Archery & Bowhunting
Shooting Sports
Manufacturers' Corner
Firearms
Classifieds
Not Hunting / General Chit Chat
1.) DParker - 05/03/2013
The package containing a couple of parts that I ordered from MidwayUSA last Friday finally showed up a few minutes ago...
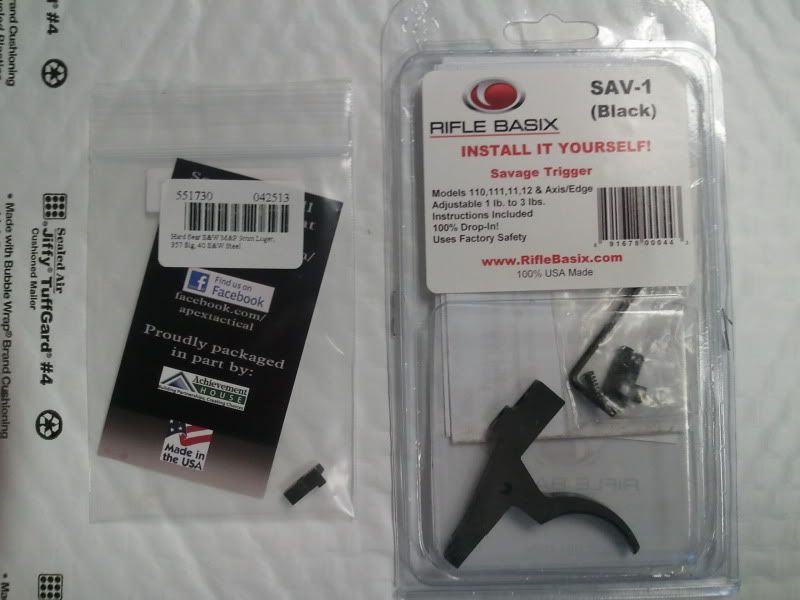
On the left is an Apex Tactical hard sear for my S&W M&P9 ([url]https://apextactical.com/store/product-info.php?pid18.html[/url]). As with most M&P owners my only real complaint with the pistol is that it's trigger is not what quite up to par with other factory handgun triggers. It's too heavy (though to be fair, most are), a touch gritty (though that has smoothed out considerably with use), has a little too much over-travel and an exessively long reset. The Apex hard sear has become an enormously popular solution to these problems for M&P owners who use their pistols for non-competition purposes, and receives consistently rave reviews from those who have installed it in their guns.
On the right is a Rifle Basix SAV-1 trigger for my Savage 111 in .30-06 ([url]http://www.riflebasix.com/index.php?main_page=product_info&cPath=1&selectOpts=1&products_id=181[/url]). My rifle was one of the models produced just before the AccuTrigger was released, while my son's 110 in .243 (bought just a week later) is equipped with the vastly improved trigger design. While the older trigger is not what I'd call [I]terrible[/I], it definitely pales in comparison with the performance of the AccuTrigger. There was some slight rework of the 10/11/110/111/112 model lines to accomodate the new trigger, which is not compatible with the older models...meaning that upgrading my .30-06 with an AT simply wasn't an option. So an improvement meant either letting a smith fiddle around with my existing trigger (something I'm simply not comfortable with) or going with an aftermarket drop-in replacement...which is what the SAV-1 is. It's pull weight is adjustable from 3 lbs. down to 14 oz., and both sear engagement and over-travel are adjustable as well. (Rifle Basix also makes the SAV-2, which is a more complex model that is adjustable to much lighter weights, geared toward competition...which is something I simply wouldn't make use of in a hunting rifle.) This product also consistently garners overwhelmingly positive reviews from its customers on all of the shooting forums I've seen it discussed on.
I'll definitely be installing both items tomorrow, but am not yet sure whether or not I'll be able to make it to the range this weekend to try them out. But at a minimum I'll come back to give a report on ease of installation for each, to be followed by range reports just as soon as I'm able.
2.) bluecat - 05/03/2013
You go girl! I have trouble changing the sweeper bag.
3.) bluecat - 05/03/2013
Let us know if you wind up with any [B]extra[/B] parts. :wink
4.) DParker - 05/03/2013
[QUOTE=bluecat;5727]You go girl! I have trouble changing the sweeper bag.[/QUOTE]
Meh, both are drop-in replacements. Even I should be able to handle that.
[QUOTE=bluecat;5728]Let us know if you wind up with any [B]extra[/B] parts. :wink[/QUOTE]
Since each is a single solid metal part, save for a couple of adjustment screws with the trigger, if I end up with extra parts I'm going to have myself checked for magic powers.
Edit: Oops. There is that trigger spring I failed to notice the first time...and there's nothing more fun than a tiny spring that launches itself into uncharted parts of the shop floor.
5.) Swamp Fox - 05/03/2013
I've had gunsmiths do trigger jobs on everything from an 11-87 (Turkey/Vigilante Edition) to Browning BLRs and Marlin 336s, to guns that trigger jobs are [B]supposed[/B] to work for, LOL
All have been successful (meaning that there was some improvement) and some have been spectacular. I've never had a gunsmith eff up a trigger job (but I've narrowed down my gunsmiths from probably three to just one over the years, in no small part just because gunsmiths are not exactly coming out of the woodwork these days, but mostly because my guy is GOOD and treats me well).
On the other hand, I have handled guns that were cared for "God-only-knows-how" and if any gunsmiths were involved they should be shot at dawn. One rifle I sighted in for a friend would fire when you pushed the safety off if you had pulled on the trigger beforehand (if memory serves). Scared the sheeetcake out of me the first time it happened.
6.) DParker - 05/03/2013
Yeah, that's the thing. I know there are really good gunsmiths out there who can make an otherwise clunky factory trigger get up and dance the Lambada. But so far I've done all of my own work, and as a result I don't know if any in the smiths in my area are in that category...and I'm not willing to experiment with them on something as safety-critical as a trigger in order to find out. Besides, the SAV-1 was only $97 (+ half of the $5 shipping) from MidwayUSA and has a well-documented positive record with a lot of Savage owners. So it just seemed like the more logical option.
7.) DParker - 05/04/2013
Well, just like every Friday night, TV sucks. So I decided to go ahead and install the Apex sear and, if I had time before dinner, the Rifle Basix trigger too. The sear install was so quick and easy that I ended up doing both installations. Here's how they went:
[U][B]Apex Hard Sear Install[/B][/U]
Removing the old sear from the M&P9 is just a matter of five very easy steps:
[LIST=1]
[*]Removing the slide assembly.
[*]Drifting out the roll pin that holds the sear assembly in place.
[*]Rocking the sear assembly out of the frame.
[*]Using a tiny punch to just push out the pin that holds the sear in place.
[/LIST]
The old sear just lifts right out at this point, and you just drop the new hard sear in it's place. Reassembly consists of simply reversing the steps above. However, it's good to stop after dropping the sear assembly back into place and, using a punch in place of the roll pin to temporary hold the assembly in place, do some thorough function-checking to make sure the new sear is working properly. Once that's done just tap the roll pin back into place and replace the slide. Done. Total time for install: About 6 minutes.
Using a trigger weight scale I measured the pull weight with the old sear at right around 5.25 lbs. Not terrible, but could be better. The Apex sear took this down to what looked to me like exactly 4 lbs. (I'm using an analog scale rather than a digital one, so I can only be so precise). a ~24% reduction in trigger weight. Pretty good. Although over-travel was not too bad with the old sear, with the new one it is non-existent. And although I had no way of exactly measuring it, I'm estimating that reset distance was reduced by about 1/8". Overall, a nice set of improvements. But I'll know more after a trip to the range.
[U][/U][B]Rifle Basix SAV-1 Install[/B]
This one was a little more involved. Removal of the old trigger and replacement with the new one was very quick and easy. Skipping the obvious steps (like removing the action from the stock) It involves nothing more than...
[LIST=1]
[*]Removing the E-clip that holds the trigger pin in place.
[*]Lifting the pin out.
[*]Removing the old trigger from the trigger assembly.
[*]Dropping the new trigger into place in the assembly.
[*]Reinserting the trigger pin.
[*]Replacing the E-clip on the pin.
[/LIST]
But then you need to adjust four different screws (safety, over-travel, pull weight spring and sear engagement) to get things working correctly. Even this wasn't difficult, but was a little time-consuming due to the trial-and-error nature of some of it. Theoretically, trigger weight adjustment is accomplished by tinkering with balancing adjustment of the sear engagement screw and the pull weight spring screw. But the dimensions of my trigger assembly and sear length resulted in the sear barely being engaged even with the sear engagement adjustment screw backed completely out, making that adjustment essentially useless. But using just the pull weight screw, and adjusting the safety screw accordingly, I was able to dial the pull weight down to a light 1.75 lbs...compared with the 3.3 lbs with the factory trigger...with a nice, crisp break, while still maintaining proper and reliable functioning of the trigger safety mechanism. Once that was done I moved the over-travel screw in until I had no noticeable over-travel at all once the trigger broke. Very nice. A little blue Loc-Tite to hold all of the adjustment screws in place and putting the action back into the stock and all is complete.
Hopefully I'll get a chance to put some lead through these two guns (not too much though...ammo is still too dear right now) at some point this weekend so I can get a feel for how much effect these improvements have on my shooting. But whenever that happens, I'll post a follow-up right afterward.
8.) DParker - 05/04/2013
[QUOTE=DParker;5750]Removing the old sear from the M&P9 is just a matter of [B][COLOR="#FF0000"]five[/COLOR][/B] very easy steps:
[LIST=1]
[*]Removing the slide assembly.
[*]Drifting out the roll pin that holds the sear assembly in place.
[*]Rocking the sear assembly out of the frame.
[*]Using a tiny punch to just push out the pin that holds the sear in place.
[/LIST][/QUOTE]

[LIST=1]
[*]Removing the slide assembly.
[*]Drifting out the roll pin that holds the sear assembly in place.
[*]Rocking the sear assembly out of the frame.
[*]Using a tiny punch to just push out the pin that holds the sear in place.
[/LIST][/QUOTE]
9.) Triton Rich - 05/04/2013
[B]Sounds like an entertaining Friday evening to me! I woulda probably taken apart the origional parts and tried to fix them up myself but buying aftermarket stuff works too I guess. :-)[/B]
10.) DParker - 05/04/2013
[QUOTE=Triton Rich;5752][B]Sounds like an entertaining Friday evening to me! I woulda probably taken apart the origional parts and tried to fix them up myself but buying aftermarket stuff works too I guess. :-)[/B][/QUOTE]
Well, the new hard sear is machined to a slightly different geometry than the M&P factory sear, which is what produces the described improvements. So is isn't just a matter of polishing metal contact areas, or something else that simple. And I wasn't about to take my Dremel to the existing sear in an attempt to replicate what Apex did, if that was even theoretically possible. Removing metal is easy...assuming you know exactly what you're doing. Adding it in other places, not so much. :wink
And there's not that much that could be done with the factory Savage trigger in order to give it anywhere near the adjustability of the SAV-1. Sure, I could have lightened the pull weight a little...but that's about it. That is, without taking a chance on mucking up the proper operation of the safety mechanism. Just not worth it to me.
11.) Triton Rich - 05/04/2013
[B]Yeah but you totally missed out on the huge adrenaline rush the first time you pulled the trigger on the pistol without being certain that it wouldn't go full auto on you![/B]:grin:
12.) DParker - 05/04/2013
[QUOTE=Triton Rich;5755][B]Yeah but you totally missed out on the huge adrenaline rush the first time you pulled the trigger on the pistol without being certain that it wouldn't go full auto on you![/B]:grin:[/QUOTE]
And I'm sure that's nothing compared with the thrill of having that go wrong and then suddenly discovering that they guy who's 4 lanes away is undercover BATFE. :p
And I'm sure that's nothing compared with the thrill of having that go wrong and then suddenly discovering that they guy who's 4 lanes away is undercover BATFE. :p
13.) Triton Rich - 05/04/2013
[B]A buddy of mine at work had an old worn out 1911 go full auto for 7 rounds, I guess it was pretty exciting! [/B]
14.) DParker - 05/04/2013
[QUOTE=Triton Rich;5757][B]A buddy of mine at work had an old worn out 1911 go full auto for 7 rounds, I guess it was pretty exciting! [/B][/QUOTE]
That's why I'll be starting out with only 2 rounds in the mag at a time until I'm satisfied that all is good. I don't think my heart can stand 17 rounds of that kind of excitement.
That's why I'll be starting out with only 2 rounds in the mag at a time until I'm satisfied that all is good. I don't think my heart can stand 17 rounds of that kind of excitement.
15.) Triton Rich - 05/05/2013
[QUOTE=DParker;5758]That's why I'll be starting out with only 2 rounds in the mag at a time until I'm satisfied that all is good. I don't think my heart can stand 17 rounds of that kind of excitement.[/QUOTE]
[B]See, I didn't even think of that when I worked on my betetta. I coulda been standing there at the range trying to hold on to the thing as it spit rounds out like an uzi![/B]
[B]See, I didn't even think of that when I worked on my betetta. I coulda been standing there at the range trying to hold on to the thing as it spit rounds out like an uzi![/B]
16.) DParker - 05/05/2013
BTW, before I actually applied any Loc-Tite I played around a little more with the adjustments and was able to shave another 0.25 lbs off the SAV-1's pull weight without any loss in safety function, leaving me with a 1.5 lb trigger. Plenty lite for a hunting rifle. Now if I can just get a chance to shoot it.
17.) DParker - 06/04/2013
Well, it took a while but I finally got a chance to hit the shooting range. We went primarily to get my son some practice for his eventual run at getting his CHL, but also so I could check out the results of the hard sear in my M&P. I can now declare that it was well worth the price. Just for grins I decided to set up a B-27 silhouette at 21 yds, that being the longest distance available on the pistol range. I rarely shoot at that distance because I practice for practical self-defense, which mostly involves 3, 7 and 12 yd targets, so I don't really have a standard baseline against which to compare. But I can say that my results were better than I expected, and certainly better than I've ever been able to shoot before at that distance.
After throwing 5 rounds at the target's head area just to make sure that the sear didn't cause any naughty full-auto behavior (it performed flawlessly, though I need to go back when I have more practice ammo to burn and give it a more rigorous workout) I decided to empty just one 17-round mag into the scoring area. Shooting off-hand my results were as follows:
[INDENT][table="width: 200, class: grid, align: left"]
[tr][td]Ring[/td][td]# of Hits[/td][/tr]
[tr][td]X[/td][td]1[/td][/tr]
[tr][td]10[/td][td]1[/td][/tr]
[tr][td]9[/td][td]8[/td][/tr]
[tr][td]8[/td][td]3[/td][/tr]
[tr][td]7[/td][td]3[/td][/tr]
[tr][td]0[/td][td]1[/td][/tr]
[/table][/INDENT]
If I were a competition-level shooter this would obviously be nothing to write home about. But it is a great improvement over anything I've previously been able to do at that distance. I attribute this to the new lighter 4-lb trigger pull, crisp break, essentially non-existent overtravel and shorter, more tactile reset that that the Apex sear delivered. At this point I think the accuracy capabilities of the pistol exceed my ability to realize them, and I'm really curious to find out what I'd be able to do with more practice and an improved sighting system...like better iron sights (the stock ones could definitely be improved upon), a micro red dot or a laser. It's time to do some more shopping.
18.) Hunter - 06/04/2013
At 21 yards, that is pretty impressive to me.
19.) DParker - 06/04/2013
[QUOTE=Hunter;6391]At 21 yards, that is pretty impressive to me.[/QUOTE]
Thanks. But this was only a single 17-rd mags worth (not counting the wild first 5 rounds just to be sure the sear was working), so I don't yet know if I can do it consistently, or if this was just a lucky string. Either way, pics or it didn't happen (the flier at the very bottom was the first of the initial 5 before I decided to go for the head of the target in order to avoid mixing them up)...
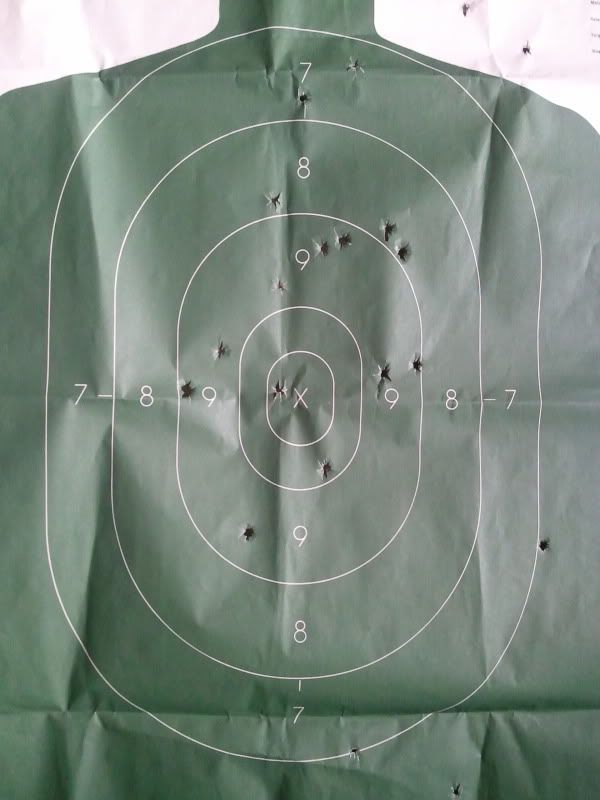
Thanks. But this was only a single 17-rd mags worth (not counting the wild first 5 rounds just to be sure the sear was working), so I don't yet know if I can do it consistently, or if this was just a lucky string. Either way, pics or it didn't happen (the flier at the very bottom was the first of the initial 5 before I decided to go for the head of the target in order to avoid mixing them up)...
20.) Triton Rich - 06/05/2013
[B]The bad guy's not going anywhere! Nice shootin' sounds like good results from your tinkering. :tu:[/B]